 Trung tâm hỗ trợ khách hàng - DIM SUPPORT
Basic implementation of DKIM. This does not set your exim.conf for you (to do that, see below).
This only set's up the keys and adds them to the dns (which is the hard part anyway)
Note, this is a beta feature, and support will be limited/non-existant until more testing is done with it.
Only try this feature if you are comfortable with system customizations.
This requires exim 4.70 or newer.
To enable it, add this to the directadmin.conf and restart DA:
dkim=1
The internal default is 0.
This flag will trigger the calling of:
/usr/local/directadmin/scripts/dkim_create.sh
The script has ways of calling it:
1) If you're wanting to add dkim to just one domain, use it like this:
./dkim_create.sh domain.com
which will trigger a task.queue call to add the newly created keys into dns.
2) DA will call the script for newly created domains like this:
/dkim_create.sh domain.com nodns
which skips the task.queue entry, as DA will add the dns right after the call to the script internall (no need to wait a minute for it to be added)
This 2nd option won't be used much.
3) If you want to trigger the adding of dkim to all of your existing domains, use this:
echo "action=rewrite&value=dkim" >> /usr/local/directadmin/data/task.queue
This option hasn't been tested much (works find for 1.. so should work fine for all.. in theory)
Link tham khảo: http://www.directadmin.com/features.php?id=1189
4) edit your exim configurations
nano /etc/exim.conf
After that find the line that contains text “remote_smtp” and add following information:
*********************************************************************************
remote_smtp:
   driver = smtp
   dkim_domain = $sender_address_domain
   dkim_selector = x
   dkim_private_key = ${if exists{/etc/virtual/$sender_address_domain/dkim.private.key}{/etc/virtual/$sender_address_domain/dkim.private.key}{0}}
   dkim_canon = relaxed
   dkim_strict = 0
***********************************************************************************
Save the file and restart exim using following command:
service exim restart |
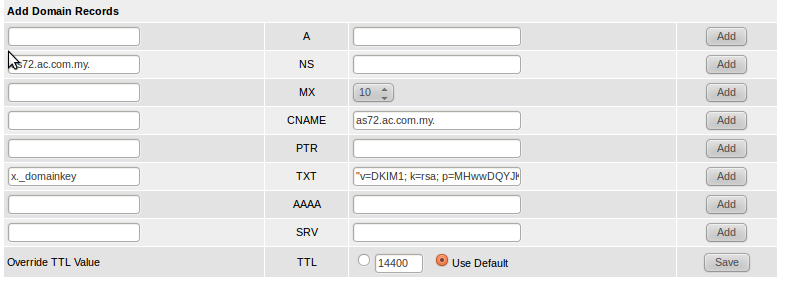
Step 5: Add dkim in a record
Need to add manually the Dkim record in dns management record as below:
Hoàn tất !
Qmail - Kloxo
- spf: Bạn cấu hình theo chuẫn sau:
v=spf1 +a +mx +ip4:IP_Server ?all
VD: v=spf1 +a +mx +ip4:8.8.8.8 ?all
- Domaikeys:
+ Bạn login vào trang quản lý Kloxo - http://IP:7778 với quyền quản trị cao nhất - admin --> Chọn "Client" --> Chọn tên Domain cần cấu hình --> Chọn "Manage DNS"
--> Edit Host record có tên là "private._domainkey" --> Copy nội dung trong mục Value và cấu hình các thông số này trong trang cấu hình Domain của P.A
VD: Host record: private._domainkey
Record Type: TXT
Address: k=rsa; p=MEwwDQYJKoZIhvcNAQEBBQADOwAwOAIxAOeE8+74ZTVwRWMyC2CfvUGjmLU8bJBRdz8uJt2Y1JD3084fyPee5w74xI0k+2HkdwIDAQAB
Chúc các bạn thành công
![[Kerio] Hướng dẫn sử dụng webmail Kerio Connect Client](https://api.dim.vn/sys/f/634546cf1fbb14c2a8abc986dba3da6e-DIM_11032019_2058_9fc3ae.jpg)
![[Kerio] Hướng dẫn tạo Email Account trên WebAdmin Kerio](https://api.dim.vn/sys/f/634546cf1fbb14c2a8abc986dba3da6e-DIM_11032019_1607_1f12de.jpg)
![[Kerio] Hướng dẫn tạo Mail Aliases trên WebAdmin Kerio](https://api.dim.vn/sys/f/634546cf1fbb14c2a8abc986dba3da6e-DIM_11032019_1431_bbafdf.jpg)
![[Kerio] Hướng dẫn tạo Mail Group trên Webadmin Kerio](https://api.dim.vn/sys/f/a6d344710a8313aff7247888c39c3a77-DIM_11032019_1410_3bb30d.png)